Designing for character models

When 3D modelling a character you can UV unwrap it and position each part separately to then import it into photoshop and design the characters skin using the targa file from the Maya UV map.
Here's my example of this below:


3 Point Perspective

Working with a 3 point perspective allows for a very interesting angle when drawing a room. 
To create this correct angle and keep everything within the room in perspective it's vital to find the 3 vanishing points of the rooms walls before starting to draw. You can see this within my sketches of a 3 point room below.


Animating in Unity

Key Frame Animation

Just like in Maya, Unity also uses key frame animation to animate any game object. I used this method to animate my camera around my scene as well as pulse the point light within the robot statue. It uses the same method as within Maya, enabling you to add a key frame whenever any value of the object changes and then animating between these key frames.

Particle Animation

You can also use particles within a game environment to make realistic looking elements such as fire or, in the case below, bubbles. Unity does have some default particles that can have its material changed to show a different colour however using sprites of elements can have a more realistic look. To do this you can add the sprite sheet to the particles material option and set the offset (depending on how many images are used within the sprite sheet) This will then animate the particles, switching in between each of the sprite images to change their look.

There are also many other options offered within the particle animation such as changing colour and opacity overtime, setting the range, height and scale and much more!

I decided not to use these particle animation in my scene however as I had already animated bubbled within Maya and was happy with the way that this looked.


Rigging and animating in Maya

There are many ways to animate in Maya, but to accurately move different sections of a model, such as a character, it must be properly rigged up first to give it the appropriate skeleton and joints to move.

Rigging

There are rigging tools in Maya that allow you to create these skeletons. It's worth keeping this all in mind while modelling the shape of the character, making sure that there are enough divisions and that they would be in the correct position for the movements that the model would be expected to make once being rigged.

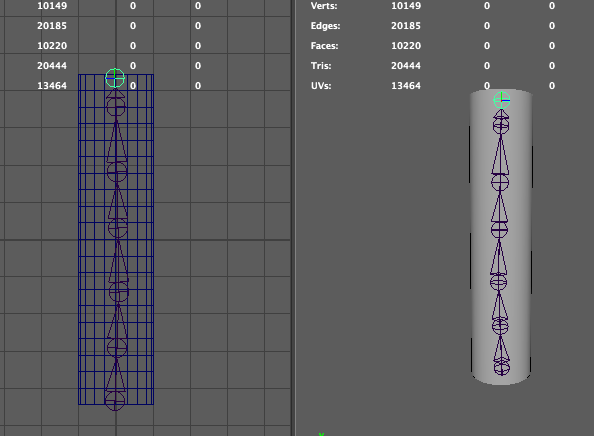
A simple way of rigging a model is by going into Skeleton and using the Join Tool to create your own skeleton structure. Each click creates a new joint, attached by a bone. The best way to create this is by using the front or side view and placing it over a model, then using a perspective view alongside this view to double check that the joint just made are indeed within the model. After this, by holding shift and selecting both the model and the skeleton joints you can use the Bind Skin tool to bind the joints to the model. Then by moving each joint it will also move the model depending on how the divisions have been placed.

I used this method to rig my octopus head, enabling me to easily change the position of the head.

Animating

You can animate an object without rigging it if you don't need to move different parts of the model individually. Rigging is brilliant for character animation! An example for a simpler animation that wouldn't need any rigging would be a ball bouncing up and down or a mice scurrying along a floor.

At the bottom of maya is an animation bar that shows how many frames in seconds there are for you to animate with, you can change these frames by second by adjusting the bar underneath these frames. To animate the object you simply select the model and the first frame on the animation bar and press 's' to set a key frame. by scrubbing through the animation frames you can change position, rotation and scale of the object and set the different values by again, pressing 's'. These values will be saved on the individual frames and the object will animate between each frame. When using Maya these automatically loop until you stop playing the animation.

As you can see above, the animation frame bar is at the bottom of Maya, the red lines show each key frame for the beating animation that I am using for the heart in the middle of my character. 
You can also open the Graph Editor window to have better control over the animation curves of each of the changing values in between the keyframes.

Importing animations to Unity

To import these animation to Unity you have to make sure to select the 'bake animations' option when importing the selected model into Unity. When it's been imported choose the animation options in the right side panel when selecting the imported animated object to create certain animation loops or single animations from the animation frames made within Maya. These can then be saved a single animation file and drag and dropped over any mesh to animate it.

3D Modelling a Character / Statue

To turn a character / statue concept into a 3D model in Maya it always helps to have some reference to model over. It helps to think not only about what the character will look like but also how it will be rigged and animated afterwards so you know where to place the divisions so that the joints will move correctly.

The best way to do this is to draw or put together reference photographs of different views of the desired character: usually at least front and side views. These images can then be imported as image planes and the modelling can be done in different perspective view points to match up to the reference images.
As you can see above I have places the reference images around where I was modelling and have various view points open at the same time to ensure that the model is staying within all of the reference points.

My Character


I want my character to match my battle arena by being another robot, but a more complex one with a circuit board heart in it's stomach area, animated seaweed covering its body, and an octopus living inside of it's head with animated tentacles swaying around the robots head.

Using this image for reference helped me a lot when modelling the character and I constantly used a front and perspective view to make sure that I stuck to the image reference.

Concept Design - Characters


Throughout this year I have learnt a lot about character design and how to turn my character ideas into a reality through drawing, both on paper and through photoshop. It's important to first understand what type of character you're going to create and what their personality is so you know what impression you want the drawing to have. From this I can then take inspiration from other artists who draw in a certain style to represent the character that I'm trying to portray.

I like to draw my initial ideas on paper:
Concept for an insectoid - maraca playing Treehopper

Concept for YouTube banner art

Concept for a scary book character

Concept for a scary book character
After sketching the designs in my sketch book it's actually very simple to get them into a digital form. Simply scan them in and, using Adobe Illustrator, you can use the live trace option to turn the drawings into vector art images which you can then put back into photoshop to carry on working with over the top.
My sketch turned into vector art


Characterised Tree - Street Scene

I wanted to create a scene that resembled an illustrated style of old children's books that might bring back nostalgia in people when viewing the picture. Because of this I didn't want to add too many textures or in depth detail to keep it looking a bit more cartoon-like.


I also wanted it to be slightly eerie for the viewer so used John Kenn Mortensen as inspiration to keep a more sketched look to the style of the overall drawing.
One of John Kenn Mortensen's drawings
The tree was to go into this overall scene of a 'haunted street', made to be drawn in an illustrative style that would suit well for a creepy ghost story for a children's book. I tried to keep myinspiration of the sketch style throughout the image by adding cross hatching to the darkest parts of the house in the middle as well as the trees and fence.

Photoshop Animation for 'Projection Mapping'

Taking my original learning of Photoshop animation I used it to create a 'projection map' of animations happening over the top of real-world objects so that it looked as though the animation was actually interacting with what it was being projected onto.

First of all I played around with drawing directly onto a subject and seeing how it could alter the look of the real-world model:

Then I took a picture of a real-world model that I knew would stay perfectly still and used that image as a reference to create my photoshop animation over the top of using the animation timeline. From this I was then able to line up the projection with my animation easily and play the animation over the object, having it appear as through the animation was interacting with it:
A beating heart gif that I drew, animated and projected onto myself
Picture that I took for reference of the animation in the video below

See the projection mapped animation over on YouTube: https://www.youtube.com/watch?v=d4orW7nQEgw&feature=youtu.be

Photoshop Animation

In lesson we learnt how to use the animation timeline to create a frame by frame animation and then export it into a gif. Below is my first attempt at doing so:
We got the template of a girl walking in a loop and I added, frame by frame, the fire ball which eventually sets her hair on fire. I had to be conscious of moving the flames to adjust to the bobbing of her body walking up and down.

Cuppa Team - Compromising to Meet Deadlines

At the beginning of this process my team and I had many grand ideas for this game: jumping through wormholes to unveil another time-dimension, included an animated narrative at the beginning of the game, allowing the player a choice in what ship they wanted to choose and much, MUCH more!

But unfortunately we only had 8 weeks to complete this game and to reach this deadline we had to make plenty of compromises!

One of these compromises was a health code that my team mat Sam Loader and I were trying to implement within the last couple of weeks. We attempted many different ways, looking at YouTube for tutorials and Unity forums for help. 
However we just didn't have enough time to debug why it was throwing errors and ultimately had to get scrapped. We had already set up a GUI element for the Health status as we wanted it to go down in percentages on the bottom left hand side of the screen but had to later delete this and the code entirely to have a clean build.

We also realised that, with this unit as well as our other two units, Visual Design and 3D modelling, we didn't have as much time as we had originally anticipated to create all of the assets that would have been needed for the alternate time-dimension, as we would have had to make a duplicate of every one asset. So instead we scrapped that idea entirely and left the game as a simple space shooter.

Overall, the game wasn't what we had originally anticipated at all but it's better to have a simple and completed game than an overly complex one full of bugs and lag. That is not a very good experience for the user at all!

Cuppa Team - Developing the Game (Art)

As our game was a 2.5D one we had to have 3D modelled assets. For those who were modelling these assets they needed our original space ship concepts turned into model reference sheets for them to work from so they could create something that we all are agreed upon. Model reference sheets are basically just the ship from 3 main angles: top, side and front.

Here is my model sheet for the alien enemy ship:
I also included the colour scheme that I was using in reference to when I created this to give the modeller something to work with. This was not, however, the final texture that we decided upon. From this model sheet though the 3D modeller was then able to create a brilliant model (Sam Loader):

As well as this I also helped out with the concept art, drawing some asteroids as well as creating the space sky background for the game:


Cuppa Team - Developing the Game (Code)

I started off the coding side of the game in C# by developing it based off a Unity tutorial called: Space Shooter Tutorial (https://unity3d.com/learn/tutorials/projects/space-shooter-tutorial). It seemed relatively similar to how we envisioned our game being once it was finished so I figured it would be a good basis to start from. To our luck our lectures had examples on how to create a simple space shooter game as well, slightly different from the tutorial that I had already been following so I attempted to merge them both together, introducing the lecturers versions of some of the gameplay into the unity tutorial one, depending on which way the team and I preferred the mechanics to work for our game. Below is one of the first videos I took after I started to merge this code together, as you can see it worked but it was very buggy! (https://www.youtube.com/watch?v=iyOdsQkI2Us&feature=youtu.be)


Debugging

My initial idea of merging two completely different game codes together seemed genius, but resulted in a lot of clashing code and meant that I had to spend a lot of my time debugging! This was done mainly by looking at the games console log and seeing what errors were occurring, such as if a variable was being assigned but not used, or if a script had a syntax error that stopped it running completely.

This game had an empty GameObject to hold the game controller script that handled the spawning of the enemies and meteors as well as listening for functions such as the score being updated which was handled in another script. Having a lot of cross referencing with scripts did mean that, if I had been working on my other projects and hadn't kept myself familiar with this one, that I would forget the structure of it all and how certain behaviours were coded, as well as what line of coded effected what in a completely different script. This could become very frustrating! By having many public variables I was able to easily drop and drag the right assets in, which also made life easier when it came to drop in the assets that the rest of the team were busy building.

As you can see, I also use commenting to help me debug. Any code that is not needed anymore or that I thought could have been throwing an error was simply commented out, meaning that it would not effect the gameplay anymore. I kept a lot in just in case I needed to uncomment it again. In the future I should tidy this up before final build.

It was very important while developing this game that I was tagging each asset correctly as this helped to reference the right object in the code. This was especially useful when coding the score system as it checked to see if the object that collided with it was a bullet and if it was then it ran the updatescore function.


Cuppa Team - Coming up with the Game Idea

Game Inspirations

Before starting any work on our game we all had a think about what 2D games we personally enjoyed and why. This way we could find out how similar (or disimilar) our tastes were and try to create a game that suited everybody. It also helped us to come up with unique ideas based around or inspired by games that we already liked to play.

Game: Little Inferno
maxresdefault.jpg

About Game: Congratulations on your new Little Inferno Entertainment Fireplace! Throw your toys into your fire, and play with them as they burn. Stay warm in there. It's getting cold outside!
Burn flaming logs, screaming robots, credit cards, batteries, exploding fish, unstable nuclear devices, and tiny galaxies. An adventure that takes place almost entirely in front of a fireplace - about looking up up up out of the chimney, and the cold world just on the other side of the wall.

Why I like it: Narrative based, simple mechanics (anyone one can play and enjoy it), dark and rough art style, unexpected plot twist

Game: Broken Age
maxresdefault.jpg

About Game: A family friendly, hand-animated, puzzle-filled adventure game with an all-star cast, including Elijah Wood, Jack Black and Masasa Moyo. Funded by a record breaking crowdfunding campaign and designed by industry legend Tim Schafer, Broken Age is a timeless coming-of-age story.

Why I like it: Narrative based, can switch from 2 different characters at any time (could be good for us with so many people,having two different perceptions of the same space), the hand animations are awesome!


Game: Gone Home
gone_home_31.jpg

About Game: June 7th, 1995. 1:15 AM You arrive home after a year abroad. You expect your family to greet you, but the house is empty. Something's not right. Where is everyone? And what's happened here? Unravel the mystery for yourself in Gone Home, a story exploration game from The Fullbright Company.Gone

Why I like it: Dark and eerie, simple, focuses on atmosphere, narrative driven, keeps audience guessing.

Game: Undertale
header.jpg

About Game: Welcome to UNDERTALE. In this RPG, you control a human who falls underground into the world of monsters. Now you must find your way out... or stay trapped forever. ((Healthy Dog's Warning: Game contains imagery that may be harmful to players with photosensitive epilepsy or similar condition.))

Why I like it: Lots of fourth wall breaking. Easy gameplay, with choices you get what you play for. Story isn't necessary to know but if you liked Earthbound (and the style of it), you'll probably love this. Also comes with an awesome chiptune-esque OST :) (I also apologise for going on about this one ALOT on Facebook lol)


Game: Limbo
header.jpg

About Game: Uncertain of his sister's fate, a boy enters LIMBO.

Why I like it: Darkly themed, with lovely background and silhouette characters. Lots of trial and errors, some gruesome deaths included. Interesting twist at the end too.


Game: Transistor
header.jpg

About Game: From the creators of Bastion, Transistor is a sci-fi themed action RPG that invites you to wield an extraordinary weapon of unknown origin as you fight through a stunning futuristic city. Transistor seamlessly integrates thoughtful strategic planning into a fast-paced action experience, melding responsive gameplay and rich atmospheric storytelling. During the course of the adventure, you will piece together the Transistor's mysteries as you pursue its former owners.

Why I like it: Gorgeous artwork, very smooth gameplay and easy to learn mechanics (kind of reminded me of Pool lol). Comes with a neat storyline, and beautiful soundtrack as well. Recommend you play Bastion if you liked this as well!


Game Genre and Narrative


After looking at games that we already enjoy playing we met up and brain stormed what our game could be about.

We eventually settled on the genre of space as we all quite enjoy the art style of the game and someone in our team is a strong 3D modellor so was partial to the idea of creating a 2.5D game, where the assets are still 3D models. This would allow us to create space ships that could tilt slightly in space, giving the illusion of a 3D game but within a 2D environment.

With the genre decided we moved onto narrative and found there was quite a divide in ideas, but after a lot of chatting we decided on the main narrative, here are our original notes:

Narrative
  • Stick to an English theme - Gentlemen and Women
  • Space - Spaceship
  • Wormhole - Dark - Racy - Demons (like LOTR) - Don’t Starve - in wormhole - character the same

  • Why is a gentleman in space? - World War 1 Veteran? Shell shock? ‘bombed into space’? (we’re blasting off again) - Clone of best flyer? - Galactic war? Defective clone on a spaceship with other clones sent to fight galactic war - earth’s last hope - score is a way to see if clone is ‘good enough’.
  • How are the worm holes used? - Force the player to enter and exit Why? - Battling with what he did in the war - shell shock - narrative only, background turn into battle field, his plane is his war fighter jet, smoking like it’s been hit.
  • Training room - vr

  • Why is a gentleman in space? - wine and cheese - going to the moon to collect the best cheese in the galaxy - selfish - aliens keeping the cheese for themselves
  • How are the worm holes used? - battling with his own selfishness

  • Why is a gentleman in space?
  • How are the worm holes used?


The overall narrative

Set in the future, a mothership is based in space where an intergalactic war is upon us. Humans of Earth have sent out clones to protect our planet and this is the protagonist that you play as, a clone sent out to fight aliens for the protection of the human race. However, these clones are based on iconic people from human's history and the protagonist you play as is a defective clone. You realise this as you play the game and find strange wormholes appear in space; when you fly into them you are flung into a World War 1 era, flying a spitfire airplane and no longer in space. These moments show the defect clone remembering the most traumatic moments from man who he is cloned from. This wormhole is dark and eerie, reflecting the clones emotions with dealing with what 'he had done' back in the war, which could also show a deeper meaning by showing the possible effects of shell shock.

Gameplay
  • WASD - Movement
  • Mouse - Rotation for Aim
  • Left Click - Cannons
  • Right Click - Missiles

Mind Map

Wants / Needs list

We were conscious of how little time we had to develop this game and didn't want to get ahead of ourselves so we decided to add a table of wants and needs for our game.
Wants
Needs
3d menu screen -XCom - extra menu items (art bible, Training room)
2 different 3D models for each object (one hidden)
Animation at beginning to tell narrative
Assets - Asteroids, spaceships, aliens, backdrop, etc - Placeholder ones to begin with while sorting out gameplay
Text over gameplay to tell narrative (Check with Ewan if it would affect grade)
Gameplay Mechanic - maneuver ship, shoot aliens, gain points
voiceovers
Sound and particle effects
smoking spaceship when dead (smoke on screen as transition back to menu screen?)
Simple menu screen

one sheet, art bible, design doc (put into google drive folder)

maps, storyboard, scripts?

Shellshock Mechanic

Hand painted graphics - simplistic

Mood Board


Concept Art

After this we went away and started concepting the ideas so we could easily show others how we envisioned the game looking as well as giving us a better idea of how it would look.


Popular Posts

Follow me on Twitter

YouTube Channel