Rigging and animating in Maya
20:50There are many ways to animate in Maya, but to accurately move different sections of a model, such as a character, it must be properly rigged up first to give it the appropriate skeleton and joints to move.
Rigging
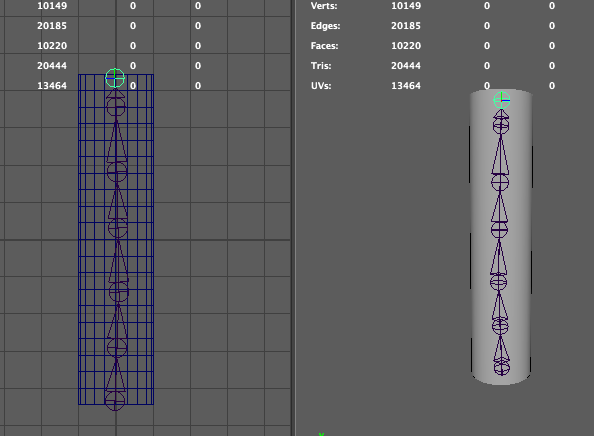
There are rigging tools in Maya that allow you to create these skeletons. It's worth keeping this all in mind while modelling the shape of the character, making sure that there are enough divisions and that they would be in the correct position for the movements that the model would be expected to make once being rigged.A simple way of rigging a model is by going into Skeleton and using the Join Tool to create your own skeleton structure. Each click creates a new joint, attached by a bone. The best way to create this is by using the front or side view and placing it over a model, then using a perspective view alongside this view to double check that the joint just made are indeed within the model. After this, by holding shift and selecting both the model and the skeleton joints you can use the Bind Skin tool to bind the joints to the model. Then by moving each joint it will also move the model depending on how the divisions have been placed.

I used this method to rig my octopus head, enabling me to easily change the position of the head.
Animating
You can animate an object without rigging it if you don't need to move different parts of the model individually. Rigging is brilliant for character animation! An example for a simpler animation that wouldn't need any rigging would be a ball bouncing up and down or a mice scurrying along a floor.
At the bottom of maya is an animation bar that shows how many frames in seconds there are for you to animate with, you can change these frames by second by adjusting the bar underneath these frames. To animate the object you simply select the model and the first frame on the animation bar and press 's' to set a key frame. by scrubbing through the animation frames you can change position, rotation and scale of the object and set the different values by again, pressing 's'. These values will be saved on the individual frames and the object will animate between each frame. When using Maya these automatically loop until you stop playing the animation.
As you can see above, the animation frame bar is at the bottom of Maya, the red lines show each key frame for the beating animation that I am using for the heart in the middle of my character.
You can also open the Graph Editor window to have better control over the animation curves of each of the changing values in between the keyframes.
Importing animations to Unity
To import these animation to Unity you have to make sure to select the 'bake animations' option when importing the selected model into Unity. When it's been imported choose the animation options in the right side panel when selecting the imported animated object to create certain animation loops or single animations from the animation frames made within Maya. These can then be saved a single animation file and drag and dropped over any mesh to animate it.


0 comments